


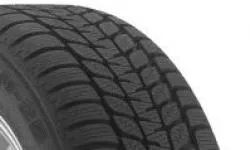
Tire shopping is a nightmare. You walk into a shop, and suddenly you’re drowning in acronyms, ply ratings, and sidewall codes that look like a secret cipher. It’s stressful. Most of us just want to roll out of the garage with rubber that doesn’t explode at 65 mph. But if you want to stop guessing and start knowing what’s under your tread, you need to look closer.
This isn’t about memorizing a textbook. It’s about understanding the machine under your wheels. We’re going to break down exactly how a tire is built, decode those confusing numbers on the side, and explain why your tire gets hot when the pressure drops. You’ll learn to check your pressure correctly and spot failure before it becomes a roadside emergency.
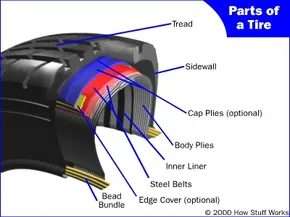
The Anatomy of Rubber
A tire isn’t a solid chunk of plastic. It’s a complex composite structure designed to be flexible yet strong. Think of it as a balloon that holds air, reinforced with steel and fabric, all wrapped in rubber.
The basic components include:
- Tread: The part that touches the road. It channels water away and provides grip.
- Sidewall: The vertical section between the tread and the rim. It protects the inner structure and absorbs impact.
- Bead: The steel wire wrapped in steel cord that locks the tire to the wheel rim.
- Inner Liner: The innermost layer, usually made of halogenated butyl rubber, which keeps air inside.
- Carcass/Body Plies: The structural skeleton. Usually made of polyester, rayon, or nylon cords embedded in rubber.
- Belt Packages: Layers of steel cords beneath the tread. They keep the tire rigid and prevent the tread from separating.
Heat is the enemy of tires. Every time a tire rotates, the sidewall flexes. This flexing generates heat. If the pressure is low, the sidewall has to flex more. More flex means more heat. And excessive heat breaks down the rubber and the bonding agents, leading to blowouts.
“Low pressure is the silent killer of tires. It causes excessive sidewall flexing, which generates dangerous levels of heat.”
Decoding the Sidewall
You’ve seen them. The long string of letters and numbers. They aren’t random. They tell you everything about the tire’s capabilities.
Size and Fitment
Take a standard size like P215/65R16.
- P: Passenger vehicle. (LT means Light Truck, ST means Special Trailer).
- 215: Width in millimeters from sidewall to sidewall.
- 65: Aspect ratio. The sidewall height is 65% of the width.
- R: Radial construction. (This is standard for almost all modern cars).
- 16: Rim diameter in inches.
If you see 225/45ZR18, that Z means the tire is rated for speeds over 149 mph. The R18 fits an 18-inch wheel. Simple.
Load Index and Speed Rating
Next to the size, you’ll find a load index and a speed rating.
- Load Index: A number like 91. This

The Anatomy of a Rubber Ring
Look at the cross-section. It’s not just a loop of rubber. It’s a layered engineering feat designed to hold air and resist the earth. The foundation is the bead bundle. This is a loop of high-strength steel cable wrapped in rubber compound and bead filler. It anchors the tire to the wheel rim. Without it, you’d have nothing but a loose tire on a loose wheel. It also survives the violence of mounting machines that force the tire onto the steel.
The body structure relies on plies. These are layers of fabric. Polyester cord is the standard. In a radial tire, these cords run perpendicular to the tread. Older designs used diagonal bias construction, where fabric ran at an angle. Belt plies get coated with rubber to seal air and bond with other layers.
Strength is often counted by ply count. A typical passenger car tire has two body plies. Compare that to a large commercial jetliner. Those tires use 30 or more plies. The difference in scale is staggering.
Reinforcement and Stability
Steel-belted radial tires add another layer of defense. Steel belts reinforce the tread area. They stop punctures. They keep the tire flat against the road for maximum contact.
Some tires include cap plies. These are extra layers of polyester fabric. They lock everything in place. You’ll find them mostly on high-speed rated tires. The goal is stability when the RPMs climb.
The sidewall handles lateral stability. It protects the body plies from the outside world. It keeps the air inside. Some designs add components to boost this lateral rigidity.
The tread itself is a chemical mixture. Natural and synthetic rubbers combine here. The sidewalls and tread are extruded and cut to length. At this stage, the tread is just a smooth block of solid rubber. It has no grooves. No tread patterns. Just a blank slate waiting for traction.
Building the Green Tire
None of these pieces stay separate for long. A tire-building machine assembles them. It places every component in its exact location. It forms the tire into a shape close to its final dimensions.
This intermediate stage is called a green tire. It has all the parts. But it’s not tight. It has no markings. It has no tread pattern. It isn’t ready for the road.
The green tire moves to a curing machine. Think of it as a waffle iron for rubber. The machine molds the sidewall markings into existence. It presses the traction patterns into the tread block. Heat bonds the components together. This process is vulcanization.
After curing, there are finishing steps. Inspections happen. The tire is complete.
Decoding the Sidewall
That strip of small print isn’t decoration. Every character tells you about the tire’s geometry and intent.
Identifying the Vehicle
The letter P at the start means passenger vehicle. It’s a car tire. LT stands for light truck. T indicates a temporary spare. Know your designation. Putting a truck tire on a sports car changes the handling characteristics entirely.
Measuring the Width
The first three digits represent the width in millimeters. In our example, 235 is the width. This measurement runs from sidewall to sidewall. It assumes the tire is mounted on its intended rim size. Rim width affects this number. Don’t measure a loose tire and expect exact accuracy.
Calculating the Profile
The aspect ratio follows the slash. It’s the height from the bead to the tread top. It’s expressed as a percentage of the width. An aspect ratio of 75 means the height is 75 percent of the width.
Do the math. 0.75 times 235 equals 176.25 mm. That’s about 6.94 inches.
Lower aspect ratios mean shorter sidewalls. High-performance tires use low profiles. Why? Lateral stability. When you corner, lateral forces push against the tire. Shorter, stiffer sidewalls resist those forces better. A tall sidewall flexes. A short one holds its line.
Construction Style
The R indicates radial construction. This is the modern standard. Older tires used D for diagonal bias or B for bias belted. The sidewall will also list ply counts. One number for the sidewall area. Another for the tread.
Wheel Fitment
The final number is the rim diameter in inches. It tells you exactly what wheel the tire fits. Get this wrong and the car doesn’t roll.
Forget the marketing fluff on the display rack. The real story about a tire’s capabilities is stamped right into its sidewall. It’s a dense block of alphanumeric codes that looks like gibberish until you know the grammar. Once you crack it, you’re looking at objective data about tread life, heat tolerance, load capacity, and speed limits.
Uniform Tire Quality Grading (UTQG)
The U.S. National Highway Traffic Safety Administration (NHTSA) mandates the Uniform Tire Quality Grading system. You’ll find these ratings on passenger car tires and can verify them via NHTSA databases. This isn’t just one metric; it’s a trio of performance indicators.
Tread Wear
The first number you see is the tread wear grade. It’s derived from controlled tests on a government track. The logic is simple: higher number equals longer life. A 300 will outlast a 100.
But here is the catch. The test conditions are sterile. They don’t match your daily commute. If you drive aggressively on rough asphalt, that 300 won’t last as long as the spec sheet promises. It’s a relative measure, not a promise. Use it to compare two tires against each other, not to predict exact mileage.
Traction
Next is the traction rating, graded AA, A, B, or C. AA is the best.
This rating measures straight-line braking on wet concrete and asphalt. It does not measure cornering grip. If you’re looking for lateral adhesion in the rain, this number alone is insufficient.
Notably, several Firestone models like the Wilderness AT and Radial ATX II sit at a B rating. Adequate for commuting, perhaps, but not top-tier for wet-weather safety.
Temperature
The third UTQG metric is the temperature grade: A, B, or C. A is the highest.
This measures heat dissipation. Tires generate heat from friction and flexing. If a tire can’t shed that heat, it degrades. Underinflation or overloading spikes this heat dangerously. Excessive heat leads to premature wear or catastrophic failure.
That same Firestone lineup mentioned above holds a C rating. It’s the lowest tier, meaning it struggles with heat buildup under stress. If you’re towing or driving at highway speeds for long stretches, a C rating is a red flag.
Decoding the Service Description
Beyond UTQG, you’ll see a string of numbers and letters. This is the service description, and it covers two critical physical limits.
Load Index
The load index is a numerical code corresponding to the maximum weight one tire can carry. It’s not linear. You can’t just divide the weight by the number.
For example, a load index of 105 translates to roughly 2039 pounds (924.87 kg) per tire. You’ll also see a pressure note, like “at 35 psi.” The tire’s capacity changes with inflation. If you run it low, that max load drops.
Speed Rating
The letter immediately following the load index is the speed rating. It denotes the maximum sustained speed the tire can handle without structural failure, assuming the load is within limits.
Take S. That’s 112 mph (180.246 kph). There are dozens of ratings, ranging from L (75 mph) to Y (186+ mph). Check the specific chart for the full list, but know that mismatching speed ratings on a vehicle can cause handling imbalances.
Calculating Overall Tire Diameter
Why does this matter? Because tire diameter affects your speedometer, gearing, and clearance. You can calculate the total diameter yourself if you know the width and aspect ratio.
Take a tire marked 235/75 R15.
- Width : 235 mm.
- Aspect Ratio : 75%. This means the sidewall height is 75% of the width.
- Sidewall Height : $235 \times 0.75 = 176.25$ mm (6.94 inches).
The diameter calculation is straightforward: Rim Diameter + (2 x Sidewall Height).
$$15 \text{ inches} + (2 \times 6.94 \text{ inches}) = 28.9 \text{ inches (733.8 mm)}$$
This is the unloaded diameter. The moment you put weight on it, the tire squats. The actual rolling diameter shrinks slightly. But for gear ratio calculations and speedometer calibration, this unloaded figure is your baseline.
Deciphering “M+S” and All-Season Claims
Tire terminology is a minefield. Manufacturers love buzzwords. But there is one designation with actual geometric definition: M+S, M&S, MS, or M/S.
This stands for “Mud and Snow.” It indicates the tire meets the Rubber Manufacturers Association (RMA) guidelines for winter capability in passenger and light truck tires.
It’s not just a sticker. To earn the MS designation, the tread pattern must adhere to strict dimensional requirements:
- Groove Depth : Pockets or slots must extend at least 1/2 inch from the tread edge toward the center.
- Width : The cross-sectional width of these grooves must be at least 1/16 inch.
- Angle : The edges of these pockets must sit between 35 and 90 degrees from the direction of travel.
- Voids : At least 25% of the tread surface area must be empty space (grooves/slots), not rubber.
In plain English, the tire needs significant biting edges and voids to channel away slush and mud. If it’s just a generic all-season with faint siping, it won’t meet the 25% void ratio.
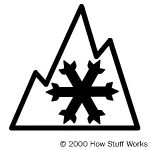
So when you see M+S, you know it’s not marketing spin. It’s a geometric guarantee of a specific tread design. It doesn’t mean it’s a dedicated snow tire—that requires the Three-Peak Mountain Snowflake (3PMSF) symbol. But it does mean the tire has the physical structure to handle more than just dry pavement.
And yet, many drivers treat M+S like a license to drive in blizzards. It’s not. It’s better than a summer tire in light snow, but nowhere near a dedicated winter rubber. Knowing the difference keeps you safer. And it keeps you off the side of the road.

Most winter tires look like they have massive voids in the tread pattern. That’s by design. More open space allows the rubber to bite into deep snow, improving grip when traction is thin. But looking at a sidewall, you might notice a gap. There is no formal test listed there. Just a claim.
This lack of standardized testing for “all-season” claims created a problem. Drivers bought tires that worked in light flurries but failed in a blizzard.
The Severe Snow Use Standard
To fix this, the Rubber Manufacturers Association and the tire industry created a specific benchmark. It is called Severe Snow Use.
You will see it as a three-peak mountain snowflake icon next to the M/S marking. It is not just a logo. It is a certification.
To earn the three-peak mountain symbol, tires must pass a rigorous ASTM procedure. Specifically, they are tested using ASTM F-1805 snow traction tests with equivalent percentage loads. The tire’s traction index must equal or exceed 110. This is compared against the ASTM E-1136 Standard Reference Test Tire.
The requirement is simple. Perform better than the standard reference tire. Meet the geometric requirements for M/S. Then prove it on snow.
If a tire lacks this icon, it is not rated for severe winter conditions. Even if the manufacturer claims otherwise.
Understanding Hydroplaning Dynamics
Hydroplaning is not just a splash. It is a loss of physical contact with the road.
It happens when a car drives through standing water. The tire pushes water aside. If the water cannot escape quickly enough, it builds up pressure. The tire lifts. It rests on a film of water.
Traction drops to near zero. The car becomes a sled.
Manufacturers mitigate this with tread geometry. Look for deep grooves running parallel to the direction of travel. These are circumferential grooves. They act as channels. Water flows through them and out the sides. This keeps the rubber on the pavement.
Without these channels, water has nowhere to go. The tire floats.
How Tires Support Weight
30 psi seems low. Cars weigh thousands of pounds. How does air at 30 pounds per square inch hold up the chassis?
Look at the tire. It is not a perfect circle.
The bottom is flat. This is the contact patch. It is the only part of the tire touching the road.
If you could see through a glass road, you would measure this flat spot. You could also estimate the car’s weight using simple math.
Take the area of the contact patch. Add them up for all four tires. Multiply by the tire pressure.
30 psi means 30 pounds of force per square inch. If your contact patch is 100 square inches per tire, that is 3,000 pounds of support. Four tires give you 12,000 pounds. Enough for a heavy SUV.
Load the car down. Or drop the pressure. The contact patch grows. The flat spot expands.
This is why underinflation increases wear. More surface area touches the road. Friction rises. Heat builds.
It is a balance of air, rubber, and weight. And if you ignore the seal on the snow or the channels for water, that balance fails fast.
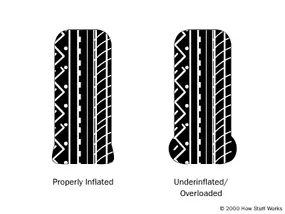

Look at the sidewall. It’s bulging. That’s the first visual cue that something is wrong. When a tire is underinflated or overloaded, it loses its perfect circle. It becomes more oval. As the wheel spins, that flat spot has to reseat itself on the pavement over and over again. The rubber at the contact patch gets bent out of shape.
Rubber isn’t magic. It doesn’t bounce back instantly or perfectly. When you bend it, you apply force. When it springs back, it gives back less force than you put in. The missing energy doesn’t disappear. It turns into heat.
Think of it like this:
The more a tire has to flex, the more force it takes to move it. And that lost energy becomes waste heat.
An underinflated tire flexes more. A properly inflated tire flexes less. More flex means more heat. Overheating degrades the tire structure. It can lead to blowouts. It’s not just about pressure. It’s about physics.
What Are CRF Numbers?
Manufacturers don’t just guess at rolling resistance. They publish numbers. Specifically, the Coefficient of Rolling Friction (CRF). You can use this number to calculate the force required to push a tire down the road.
Don’t confuse CRF with traction. Traction is about grip. CRF is about drag. It’s the resistance caused by the tire’s shape and material. The formula is simple. Force equals CRF multiplied by the weight on the tire.
Here is how different wheels compare in real-world scenarios:
- Low rolling resistance car tire: 0.006 – 0.01
- Ordinary car tire: 0.015
- Truck tire: 0.006 – 0.01
- Train wheel: 0.001
Let’s run the numbers for a typical sedan. Say your car weighs 4,000 pounds (1814 kg). Use a standard CRF of 0.015. The math is straightforward.
4,000 x 0.015 = 60 pounds of force.
That’s the constant drag pulling against your forward motion. But force isn’t power. Power depends on speed. You already know power equals force times speed. So the energy used by the tires changes as you drive faster.
At 75 mph (120.7 kph), those tires are consuming 12 horsepower. At 55 mph (88.5 kph), they use 8.8 horsepower. All that horsepower turns into heat. Most of it stays in the tire. Some of it transfers to the road. The road actually bends slightly under load.
Three variables dictate how much force pushes against you and how much heat builds up:
- Weight on the tires: Heavier cars create more resistance.
- Speed: Faster driving increases power loss significantly.
- CRF: This number spikes when pressure drops.
Drive on sand and the CRF jumps. More heat goes into the ground. Less stays in the tire. But the resistance is brutal.
Problems With Tires
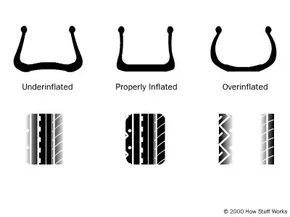
Underinflation is a silent killer for your tread. When air pressure drops, the sidewalls flex too much, pushing the outer edges of the contact patch into the asphalt. You’ll see the shoulders wearing down long before the rest of the rubber. It’s not just a cosmetic issue. Fuel efficiency takes a hit because rolling resistance spikes. Heat also builds up inside the casing. That heat can delaminate the belts or even cause a blowout.
Check your pressure with a gauge once a month. Do it when the tires are cold.
Overinflation and The Center Wear Trap
Too much air does the opposite. The tire bulges in the middle. The center rib hits the road while the edges float. Wear concentrates in that central groove pattern.
Manufacturers list a maximum pressure on the sidewall. That number is a limit, not a target. Most carmakers recommend lower pressures for comfort. You get a softer ride. You absorb potholes better.
But if you push for maximum mileage, higher pressure helps. It reduces the contact patch size. Rolling resistance drops. You save fuel. The trade-off is a harsher ride and uneven wear in the center.
Misalignment and Uneven Tread Patterns
Wheels that aren’t aligned properly destroy tires in unique ways. If the camber is off, you wear either the inside or the outside edge heavily. The tread might look rough. It can have a slightly torn appearance where the rubber has been scrubbed or clawed by the road.
This isn’t just about the tread shape. It’s about geometry. Toe settings, camber angles, and caster all play a role. Get a four-wheel alignment if your car pulls to one side. Or if you notice feathering on the tread blocks.
Beyond The Rubber Wall
We often treat tires like simple tubes. They aren’t. They are complex assemblies. You have steel belts for strength. Polyester cords for stability. Rubber compounds for grip and wear resistance. The sidewall structure matters. The tread ribs manage heat and water displacement.
When you shop for new tires, don’t just look at the price. Look at the construction. Look at the load index. Look at the speed rating. These factors dictate how the tire behaves when you’re pushing it on a wet highway or carving through a snowy turn.
Tire FAQ
What are tires made of?
Tires are composite structures. They use steel belts for puncture resistance and structural integrity. Polyester cords reinforce the sidewalls. Natural and synthetic rubber makes up the tread and sidewalls. The specific rubber compound determines grip and longevity.
What does the small print on a tire mean?
The sidewall is packed with data. You’ll see the tire type (all-season, summer, etc.). The width is listed in millimeters. The aspect ratio is the height-to-width percentage. Construction type (radial vs. bias) is noted. Rim diameter tells you what wheel fits. Uniform Tire Quality Grading (UTQG) rates treadwear, traction, and temperature resistance. The service description includes load index and speed symbol.
What are common problems with tires?
Underinflation and overinflation are the most frequent issues. They cause uneven wear and heat buildup. Misalignment is another big culprit. It leads to rapid, uneven wear on the shoulders or edges. Balancing issues cause vibration.
How long can you keep a tire?
Age matters as much as tread depth.


